Note: Canon's ScanGear software is not available for use with Mac operating systems.
Software acquisition
If you are a Community Network customer and need to have the ScanGear software installed, please contact your Community Network support group.
NOTE: Black and white copiers/scanners will only function with ScanGear version 1.6, color copiers/scanners will only work with version 2.0.
Scanning a Document
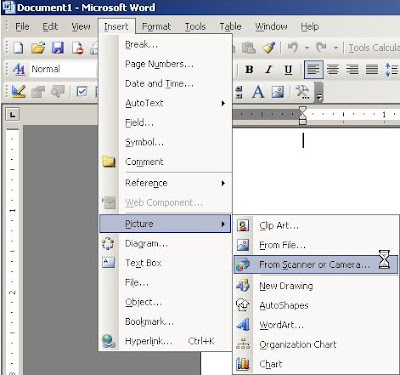
1. Start the application you're using to scan.The instructions below apply to Microsoft Word 2003. If you are using another application, refer to the documentation provided with your application for commands and procedures used to select Network ScanGear and start scanning. Click "Insert"Click "Picture"Click "From Scanner or Camera"

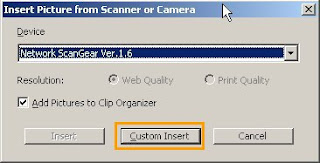
2. This opens the device selection window. Select the appropriate device, in this case "Network ScanGear Ver.1.6" (in most cases there will be only one device)NOTE: If Network ScanGear doesn't show in the device box, follow these stepsClick Custom Insert to bring up the scanning software.

3. At this point, go to copier/scannerPlace your document face down on the platen glass portion of the scanner. On the scanner operating panel or touch panel display, press System or Scan. Login with your department ID Click the Scan buttonPress the Online button. Note: While the scanner is in Online mode other normal functions on the copier will not work. Back at your computer Select the appropriate resolution (300dpi is fine for text)Select the appropriate original size of the document (letter, A4, etc) Change original placement to "platen glass" Click scan.After the document is done scanning click cancel if you have no other documents to scan.
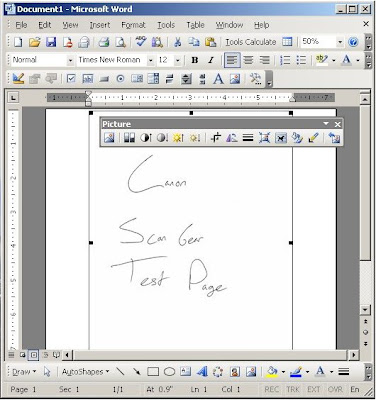
 The scanned page(s) appear in Word. If you would like to edit the text an Optical Character Recognition (OCR) software program, such as Omni Page Pro is required.
 4. After the document is done scanning return to the Ikon copier/scanner.Remove your documentPress Offline to disconnect the scanner from the network in order to use other functions. Logout/Lock the printer by pressing the ID button.
5. You have successfully completed scanning a document into Microsoft Word 2003.
Note: If your computer is unable to find a scanner please perform the following steps. On your computer/workstation, click the Start button, then select Programs – Network ScanGear – ScanGear Tool. Ensure the scanner to be used is selected. This information shows up in the box labeled "A" in the image below. Your Community Network technician should set that up for you when they install the ScanGear software. If your scanner does not appear under Selected Scanner, Click the Discover button to search for scanners on the network and display the results in the list of scanners. Click the scanner to be used in the list, then Click the Select button. After selecting the scanner, you can Click the Test Connection button to check that the selected scanner can be used.

After selecting the appropriate scanner you will be able to scan documents again. If you have problems finding a scanner please contact your DCA or technical support staff for further assistance.


ไม่มีความคิดเห็น:
แสดงความคิดเห็น